CI/CD
Setup
We will be using a virtual machine in the faculty's cloud.
When creating a virtual machine in the Launch Instance window:
- Name your VM using the following convention:
cc_lab<no>_<username>, where<no>is the lab number and<username>is your institutional account. - Select Boot from image in Instance Boot Source section
- Select CC 2024-2025 in Image Name section
- Select the m1.xlarge flavor.
In the base virtual machine:
- Download the laboratory archive from here.
Use:
wget https://repository.grid.pub.ro/cs/cc/laboratoare/lab-ci-cd.zipto download the archive. - Extract the archive.
- Run the setup script
bash lab-ci-cd.sh.
$ # download the archive
$ wget https://repository.grid.pub.ro/cs/cc/laboratoare/lab-ci-cd.zip
$ unzip lab-ci-cd.zip
$ # run setup script; it may take a while
$ bash lab-ci-cd.sh
Before we start
If you do not have a GitHub account, create one before starting this laboratory. It will be used to interact with a repository and create the CI/CD pipeline in it.
What is CI/CD?
CI/CD stands for Continuous Integration and Continuous Deployment/Delivery. It is a software engineering practice that automates the process of testing, building, and deploying applications. The end goal is to deliver code changes reliably to the end users.
With CI/CD, each code change goes through a consistent pipeline of automated steps such as linting, compiling, testing, and deployment, thus reducing human error and speeding up development cycles.
Why do we need CI/CD?
CI/CD pipelines are useful to:
- detect errors early on with automated tests
- release new code versions to production in a stable, reliable manner
- reduce human errors during deployments
- quickly roll back to a stable version when needed
What tools we will use?
In this lab, we'll use Github Actions to dive into the anatomy of a CI/CD pipeline and understand how it works. We'll also use ArgoCD to deploy our application to a Kubernetes cluster.
GitHub Actions
GitHub Actions is an automation tool built into GitHub. It allows you to define custom pipelines directly in your repository using YAML configuration files.
Argo CD
Argo CD - alongside the complementary tool Argo Rollouts - is a declarative, GitOps continuous delivery tool for Kubernetes. It allows you to manage your Kubernetes applications using Git repositories as the source of truth. With Argo CD, you can automate the deployment and management of your applications in a Kubernetes cluster.
GitHub Actions Workflows
GitHub Actions allows you to automate tasks within your GitHub repositories in CI/CD pipelines by writing a yaml configuration file called Workflow.
A workflow is defined by a set of jobs that are triggered by specific events, like a push to the main branch or a manual trigger.
You will be working starting from this repository: https://github.com/andreia-oca/ci_cd_lab.
Fork it into your GitHub account and clone it in the Openstack VM.
There are two methods of cloning the repo from GitHub, choose one of them:
(a) Git over HTTPS:
In this case, you will need to create a Personal Access Token for being able to push changes. Follow the instructions from here.
Run the commands below to clone the repository in your Openstack VM:
student@cc-lab:~$ git clone https://github.com/<your-gitub-username>/ci_cd_lab.git
student@cc-lab:~$ cd ci_cd_lab/
(b) Git over SSH:
You will need to create a SSH keypair in your lab VM and configure it into your GitHub account.
Follow the instructions from here.
Run the commands below to clone the repository in your Openstack VM:
student@cc-lab:~$ git clone git@github.com:<your-github-username>/ci_cd_lab.git
student@cc-lab:~$ cd ci_cd_lab/
Inspect the .github/workflows/deploy.yaml:
# .github/workflows/deploy.yaml
name: Build CI/CD

# Trigger the workflow on a commit push to the `main` branch
on:
  # Trigger the workflow on a commit push to the `main` branch
  push:
    branches:
      - main

jobs:
  # Job to compile the application
  compile:
    # Specify the Os for the runner (container)
    runs-on: ubuntu-latest  # Use the latest Ubuntu runner

    steps:
      # Step 1: Checkout the repository code into the runner
      - name: Checkout code
        uses: actions/checkout@v4

      # Step 2: Set up Go environment with version 1.22
      - name: Set up Go
        uses: actions/setup-go@v5
        with:
          go-version: '1.22'

      # Step 3: Download Go module dependencies
      - name: Install dependencies
        run: go mod download

      # Step 4: Compile the Go application into a binary named 'myapp'
      - name: Compile binary
        run: go build -o myapp
Exercise - Create a new job to enable automated tests
In this exercise, you will create a new job called test that runs Go tests before the compile job:
Your workflow should:
- Run tests first by executing the command
go test ./.... - If the
testjob is successful, proceed to thecompilejob to build the binary.
Note: To control the execution order and add conditions between jobs, GitHub Actions provides the needs and if directives.
Refer to the official documentation to learn how to use them.
Complete and add the following snippet to .github/workflows/deploy.yaml:
jobs:

[...]

  test:
    runs-on: ubuntu-latest
    steps:
      - name: Checkout code
        uses: actions/checkout@v4

      - name: Set up Go
        uses: actions/setup-go@v5
        with:
          go-version: '1.22'

      - name: Install dependencies
        run: go mod download

      # TODO 01 - Add a step to run tests
      - name: Run tests
        run: #TODO

  compile:
    [...]
    # TODO 02 - Make sure that the `test` job is run before `compile`
To take effect, commit the changes from the deploy.yaml file and push them to your forked repository:
student@cc-lab:~$ git status
student@cc-lab:~$ git add .github/workflows/deploy.yaml
student@cc-lab:~$ git commit -m "Add test step to workflow"
student@cc-lab:~$ git push
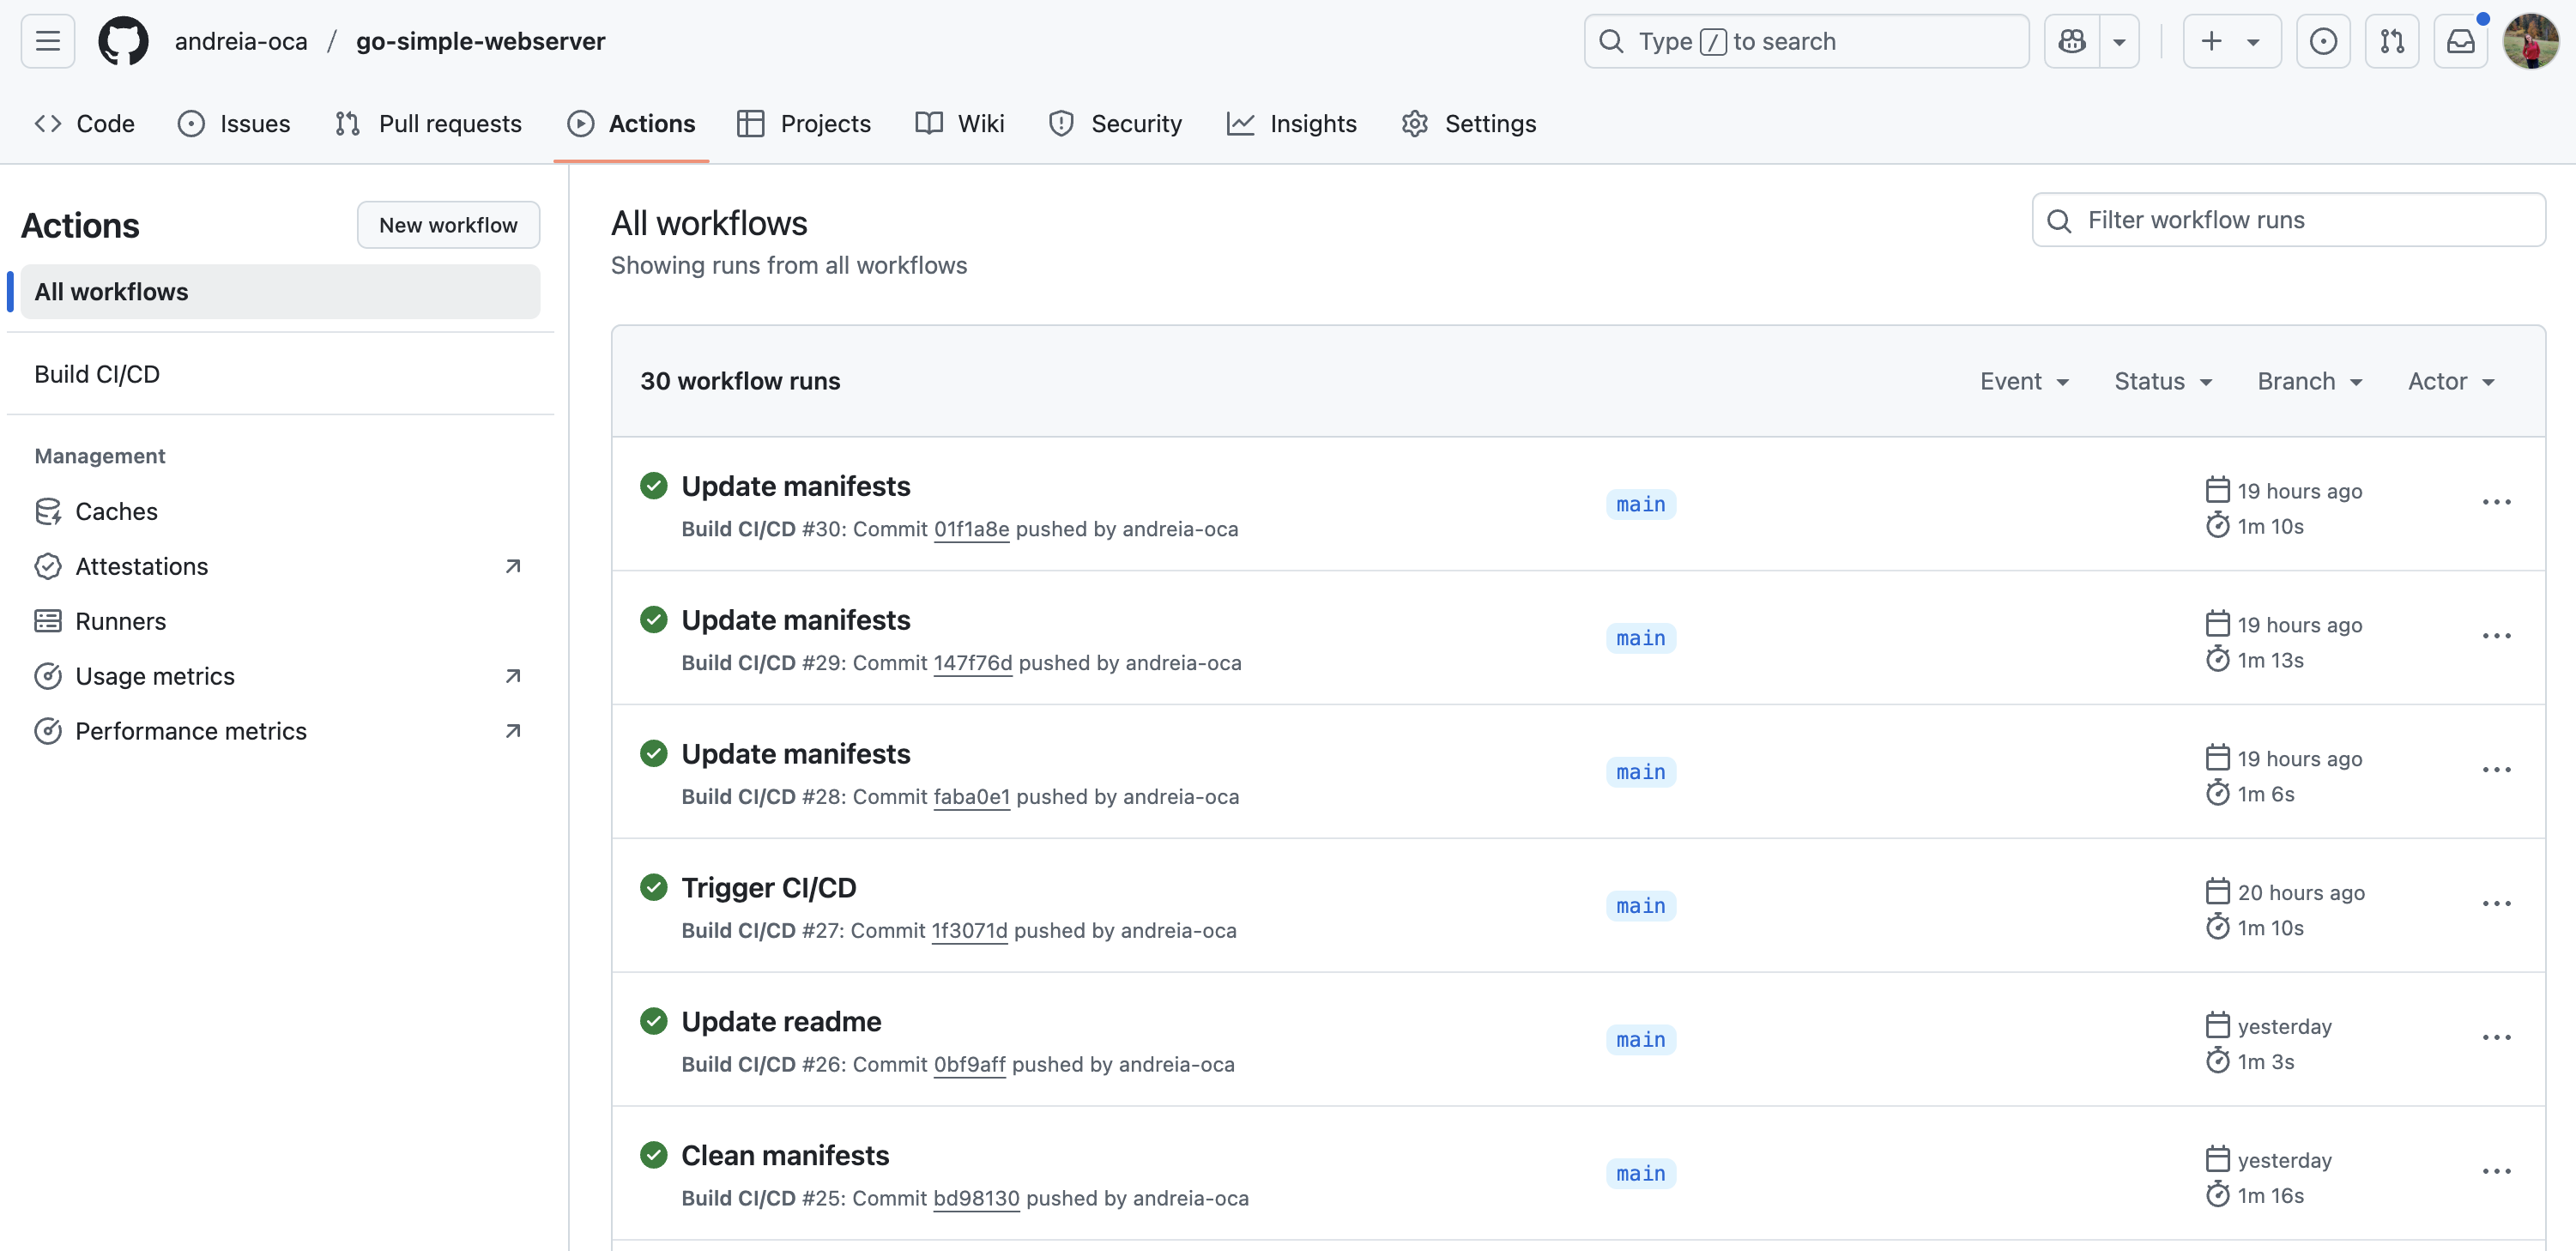
Check the Actions tab from your GitHub repository page to monitor the workflow's output. It should look similar to this:
Exercise - Create a new job to build a docker image
In this exercise, you will create a new job called build that packages your compiled Go server into a Docker image and pushes it to GitHub Container Registry (GHCR).
  build:
    # Specify the OS for the runner
    runs-on: ubuntu-latest

    # Grant write permissions to access repository contents and GitHub Container Registry
    permissions:
      contents: write
      packages: write

    # Run this job only after the 'compile' job completes successfully
    needs: compile
    if: success()

    steps:
      # Step 1: Checkout the repository code
      - name: Checkout code
        uses: actions/checkout@v4

      # Step 2: Set up the Go environment (Go 1.22)
      - name: Set up Go
        uses: actions/setup-go@v5
        with:
          go-version: '1.22'

      # Step 3: Log in to GitHub Container Registry (GHCR) using GitHub Actions token
      - name: Log in to GHCR
        uses: docker/login-action@v3
        with:
          registry: ghcr.io
          username: ${{ github.actor }}             # GitHub username (actor triggering the workflow)
          password: ${{ secrets.GITHUB_TOKEN }}     # Automatically provided GitHub token

      # Step 4: Build the Docker image and tag it with the repository name and 'latest'
      - name: Build Docker image
        run: docker build -t ghcr.io/${{ github.repository }}:latest .

      # Step 5: Push the Docker image to GitHub Container Registry
      - name: Push Docker image
        run: docker push ghcr.io/${{ github.repository }}:latest
If your name contains uppers case letters you need to change the image name to lowercase. The easiest fix is to hardcode your username and repository instead of ${{ github.repository }}.
For example, if your name is JohnDoe, you can use ghcr.io/johndoe/ci_cd_lab:latest.
Refer to the documentation here to better understand how to interact with GHCR.
To take effect, commit the changes from the deploy.yaml file and push them to your forked repository:
student@cc-lab:~$ git status
student@cc-lab:~$ git add .github/workflows/deploy.yaml
student@cc-lab:~$ git commit -m "Add build step to workflow"
student@cc-lab:~$ git push
Check the Actions tab from your GitHub repository page to monitor the workflow's output.
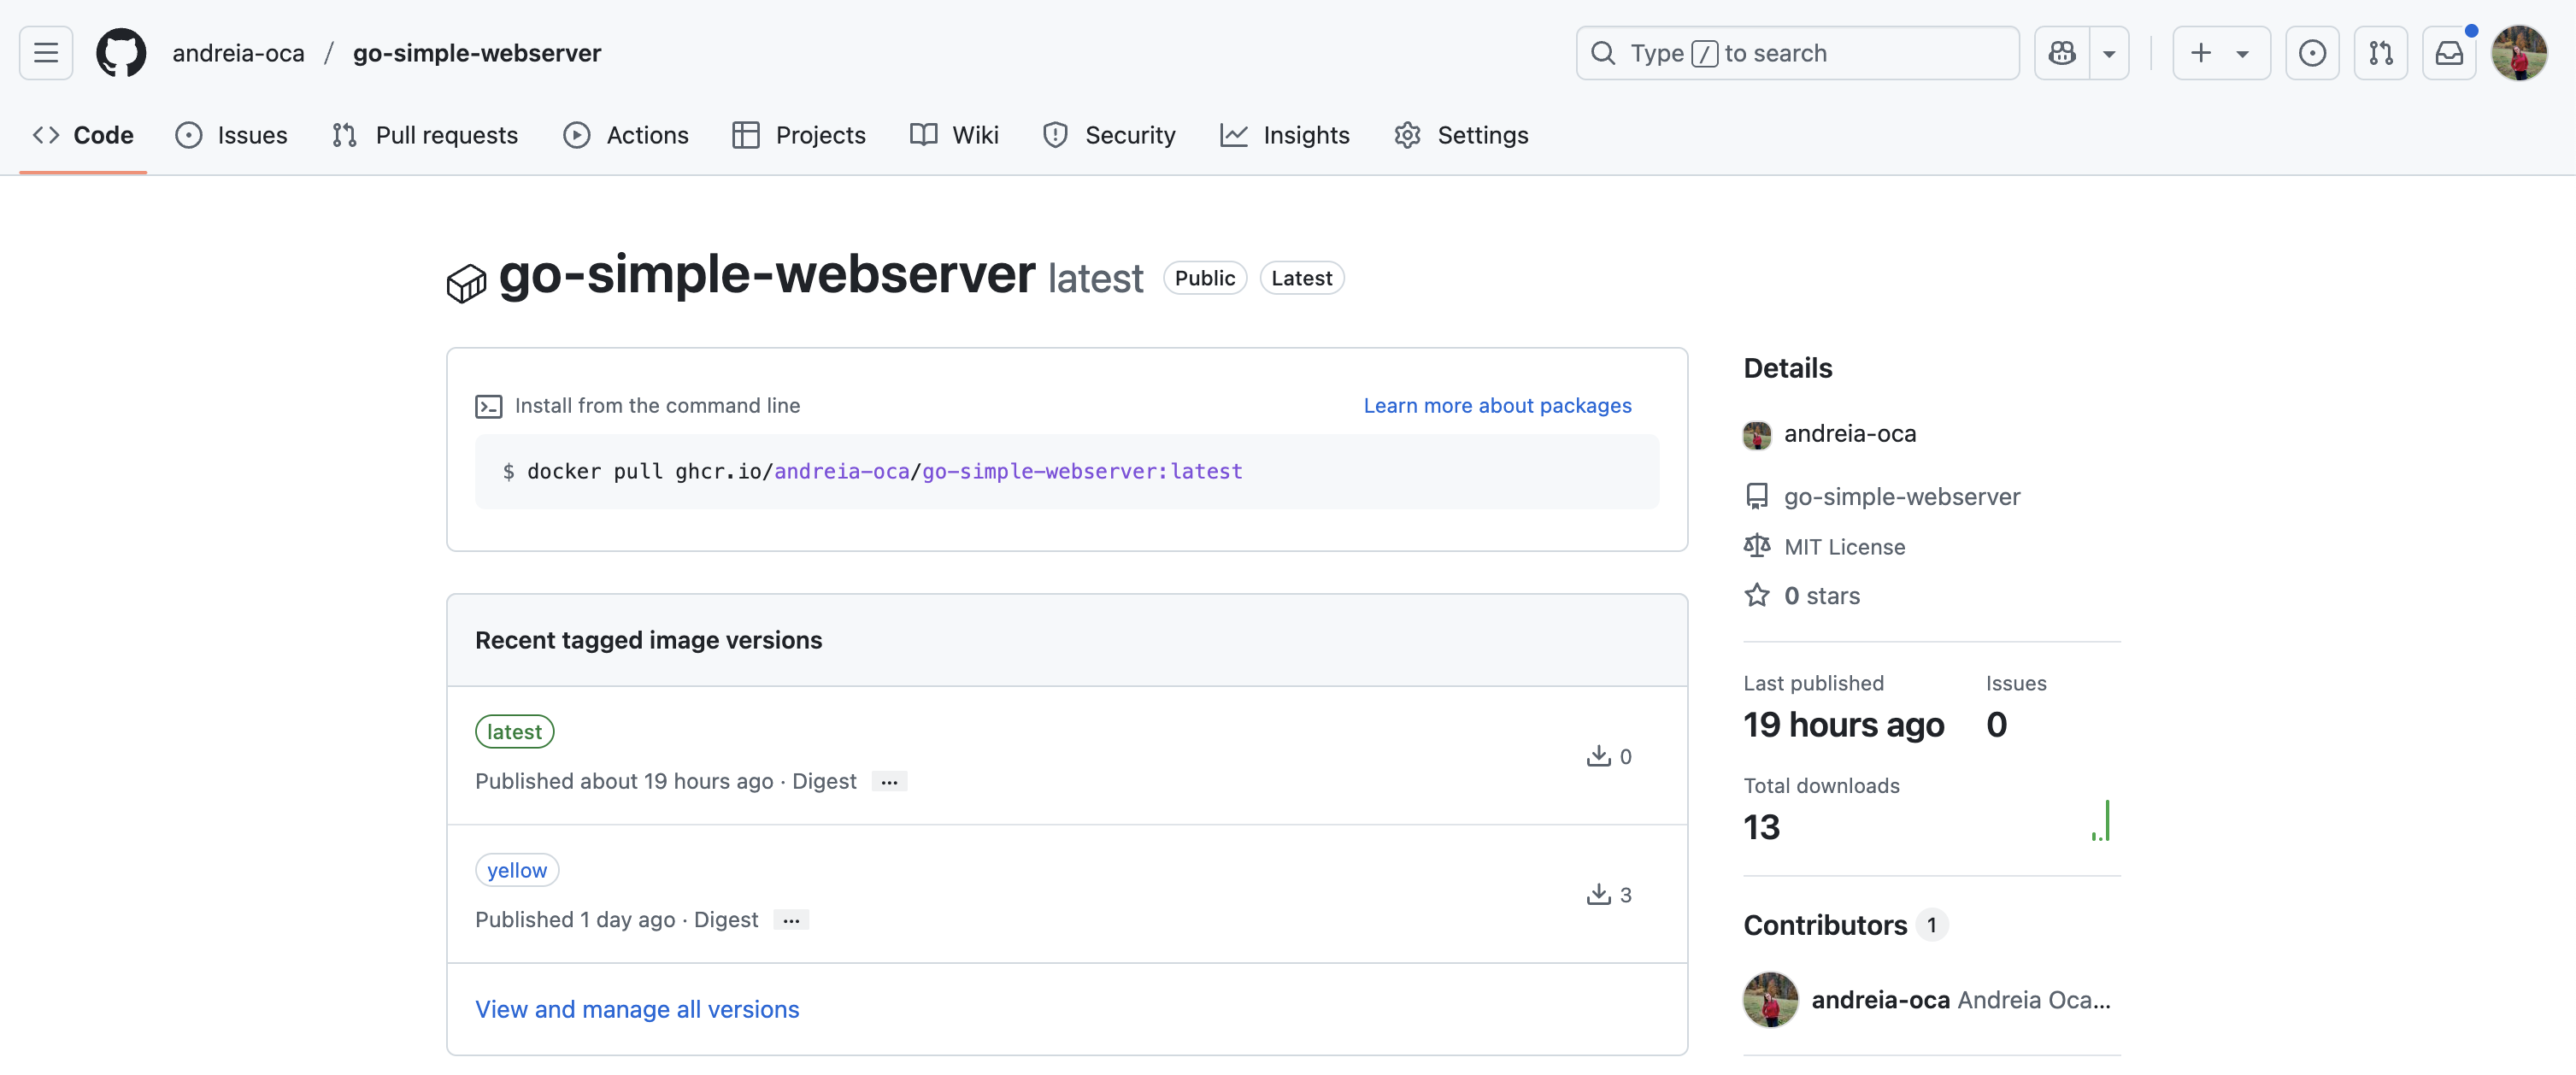
Check the Packages page from Github to see the built Docker image there. Packages should be found at https://github.com/<your-github-username>?tab=packages.
It should look similar to this:
Argo CD
Argo CD is a declarative, GitOps-based continuous delivery tool for Kubernetes. It enables you to deploy applications by syncing the desired state defined in Git repositories with your actual cluster.
argocd is already installed in on your VM by the lab_ci_cd.sh setup script.
Creating a Kubernetes cluster
As in the previous laboratories, we will create a cluster on the lab machine, using the kind create cluster command:
student@lab-kubernetes:~$ kind create cluster
Creating cluster "kind" ...
 ✓ Ensuring node image (kindest/node:v1.23.4) 🖼
 ✓ Preparing nodes 📦
 ✓ Writing configuration 📜
 ✓ Starting control-plane 🕹️
 ✓ Installing CNI 🔌
 ✓ Installing StorageClass 💾
Set kubectl context to "kind-kind"
You can now use your cluster with:

kubectl cluster-info --context kind-kind

Thanks for using kind! 😊
It is recommended that you use port-forwarding instead of X11 forwarding to interact with the UI.
Creating resources for Argo CD in k8s
To enable and create the resources required by Argo CD in your Kubernetes cluster, run the following commands:
student@cc-lab:~$ kubectl create namespace argocd
student@cc-lab:~$ kubectl apply -n argocd -f https://raw.githubusercontent.com/argoproj/argo-cd/stable/manifests/install.yaml
student@cc-lab:~$ kubectl get all -n argocd
NAME                                                   READY   STATUS    RESTARTS   AGE
pod/argocd-application-controller-0                    1/1     Running   0          25h

[...]

NAME                                             READY   AGE
statefulset.apps/argocd-application-controller   1/1     25h
Creating an Argo CD project in k8s
To deploy your application using Argo CD, create an application.yaml file that defines an Argo CD Application resource.
This YAML configuration tells Argo CD where to find your application's manifests (in your git repository - ./manifests) and where to deploy them inside your Kubernetes cluster (in the default namespace):
student@cc-lab:~/ci_cd_lab$ cat application.yaml
apiVersion: argoproj.io/v1alpha1
kind: Application
metadata:
  name: go-simple-webserver
  namespace: argocd
spec:
  project: default
  source:
    repoURL: https://github.com/<todo-add-your-github-username>/ci_cd_lab.git
    targetRevision: HEAD
    path: manifests
  destination:
    server: https://kubernetes.default.svc
    namespace: default
Apply the Argo manifest application.yaml to link the repository to an Argo project in K8s:
student@cc-lab:~$ kubectl apply -f application.yaml
Check the resources created in the argocd namespace:
student@cc-lab:~$ kubectl get application go-simple-webserver -n argocd
NAME                  SYNC STATUS   HEALTH STATUS
go-simple-webserver   Unknown        Healthy
Note: There are no deployments of your webserver yet, because the Argo project is not synced with the cluster.
Argo CD provides a dashboard to interact with the CI/CD pipeline on localhost:8080.
There are two options for connecting to the Argo CD user interface: SSH tunneling or Chrome Remote Desktop.
Option 1: SSH tunneling
Follow this tutorial to configure the SSH service to bind and forward the 8080 port to your machine:
ssh -J fep -L 8080:127.0.0.1:8080 -i ~/.ssh/id_fep student@10.9.X.Y
Option 2: Chrome Remote Desktop
An alternative to SSH tunneling or X11 forwarding is Chrome Remote Desktop, which allows you to connect to the graphical inteface of your VM.
If you want to use this method, follow the steps from here.
Start a kubectl port-forward on the VM:
kubectl port-forward svc/argocd-server -n argocd 8080:443
Run the following command to get the password from the admin account and login into the dashboard:
kubectl get secret argocd-initial-admin-secret -n argocd -o jsonpath="{.data.password}" | base64 -d && echo
Login to Argo CD
To interact using the argocd CLI or to login to the Argo dashboard, you need to get the initial password for the admin user:
student@cc-lab:~$ kubectl get secret argocd-initial-admin-secret -n argocd -o jsonpath="{.data.password}" | base64 -d && echo
To login to the Argo CD CLI, use the following command:
student@cc-lab:~$ argocd login localhost:8080 --username admin --password <password-above> --insecure
For the Argo dashboard, open your browser and navigate to http://localhost:8080. Use the same credentials as above.
Creating an Argo CD deployment
The manifest below defines a Kubernetes Deployment for the go-simple-webserver application.
It runs two replicas of a container using the image hosted on GitHub Container Registry, exposing port 8080 for incoming traffic.
student@cc-lab:~/ci_cd_lab$ cat manifests/deployment.yaml
apiVersion: apps/v1
kind: Deployment
metadata:
  name: go-simple-webserver
  labels:
    app: go-simple-webserver
spec:
  replicas: 2
  selector:
    matchLabels:
      app: go-simple-webserver
  template:
    metadata:
      labels:
        app: go-simple-webserver
    spec:
      containers:
        - name: webserver
          image: ghcr.io/<todo-add-your-github-username>/ci_cd_lab:latest
          ports:
            - containerPort: 8080
Push the manifests/deployment.yaml in your repository and sync the Argo project in k8s to create a deployment:
student@cc-lab:~/ci_cd_lab$ git add manifests/deployment.yaml
student@cc-lab:~/ci_cd_lab$ git commit -m "Add deployment for go-simple-webserver"
student@cc-lab:~/ci_cd_lab$ git push
Check the resources that already exist in the default namespace:
student@cc-lab:~$ kubectl get all -n default
Sync the Argo project to create the deployment:
student@cc-lab:~$ argocd app sync go-simple-webserver
Check the new resources created in the default namespace:
student@cc-lab:~$ kubectl get all -n default
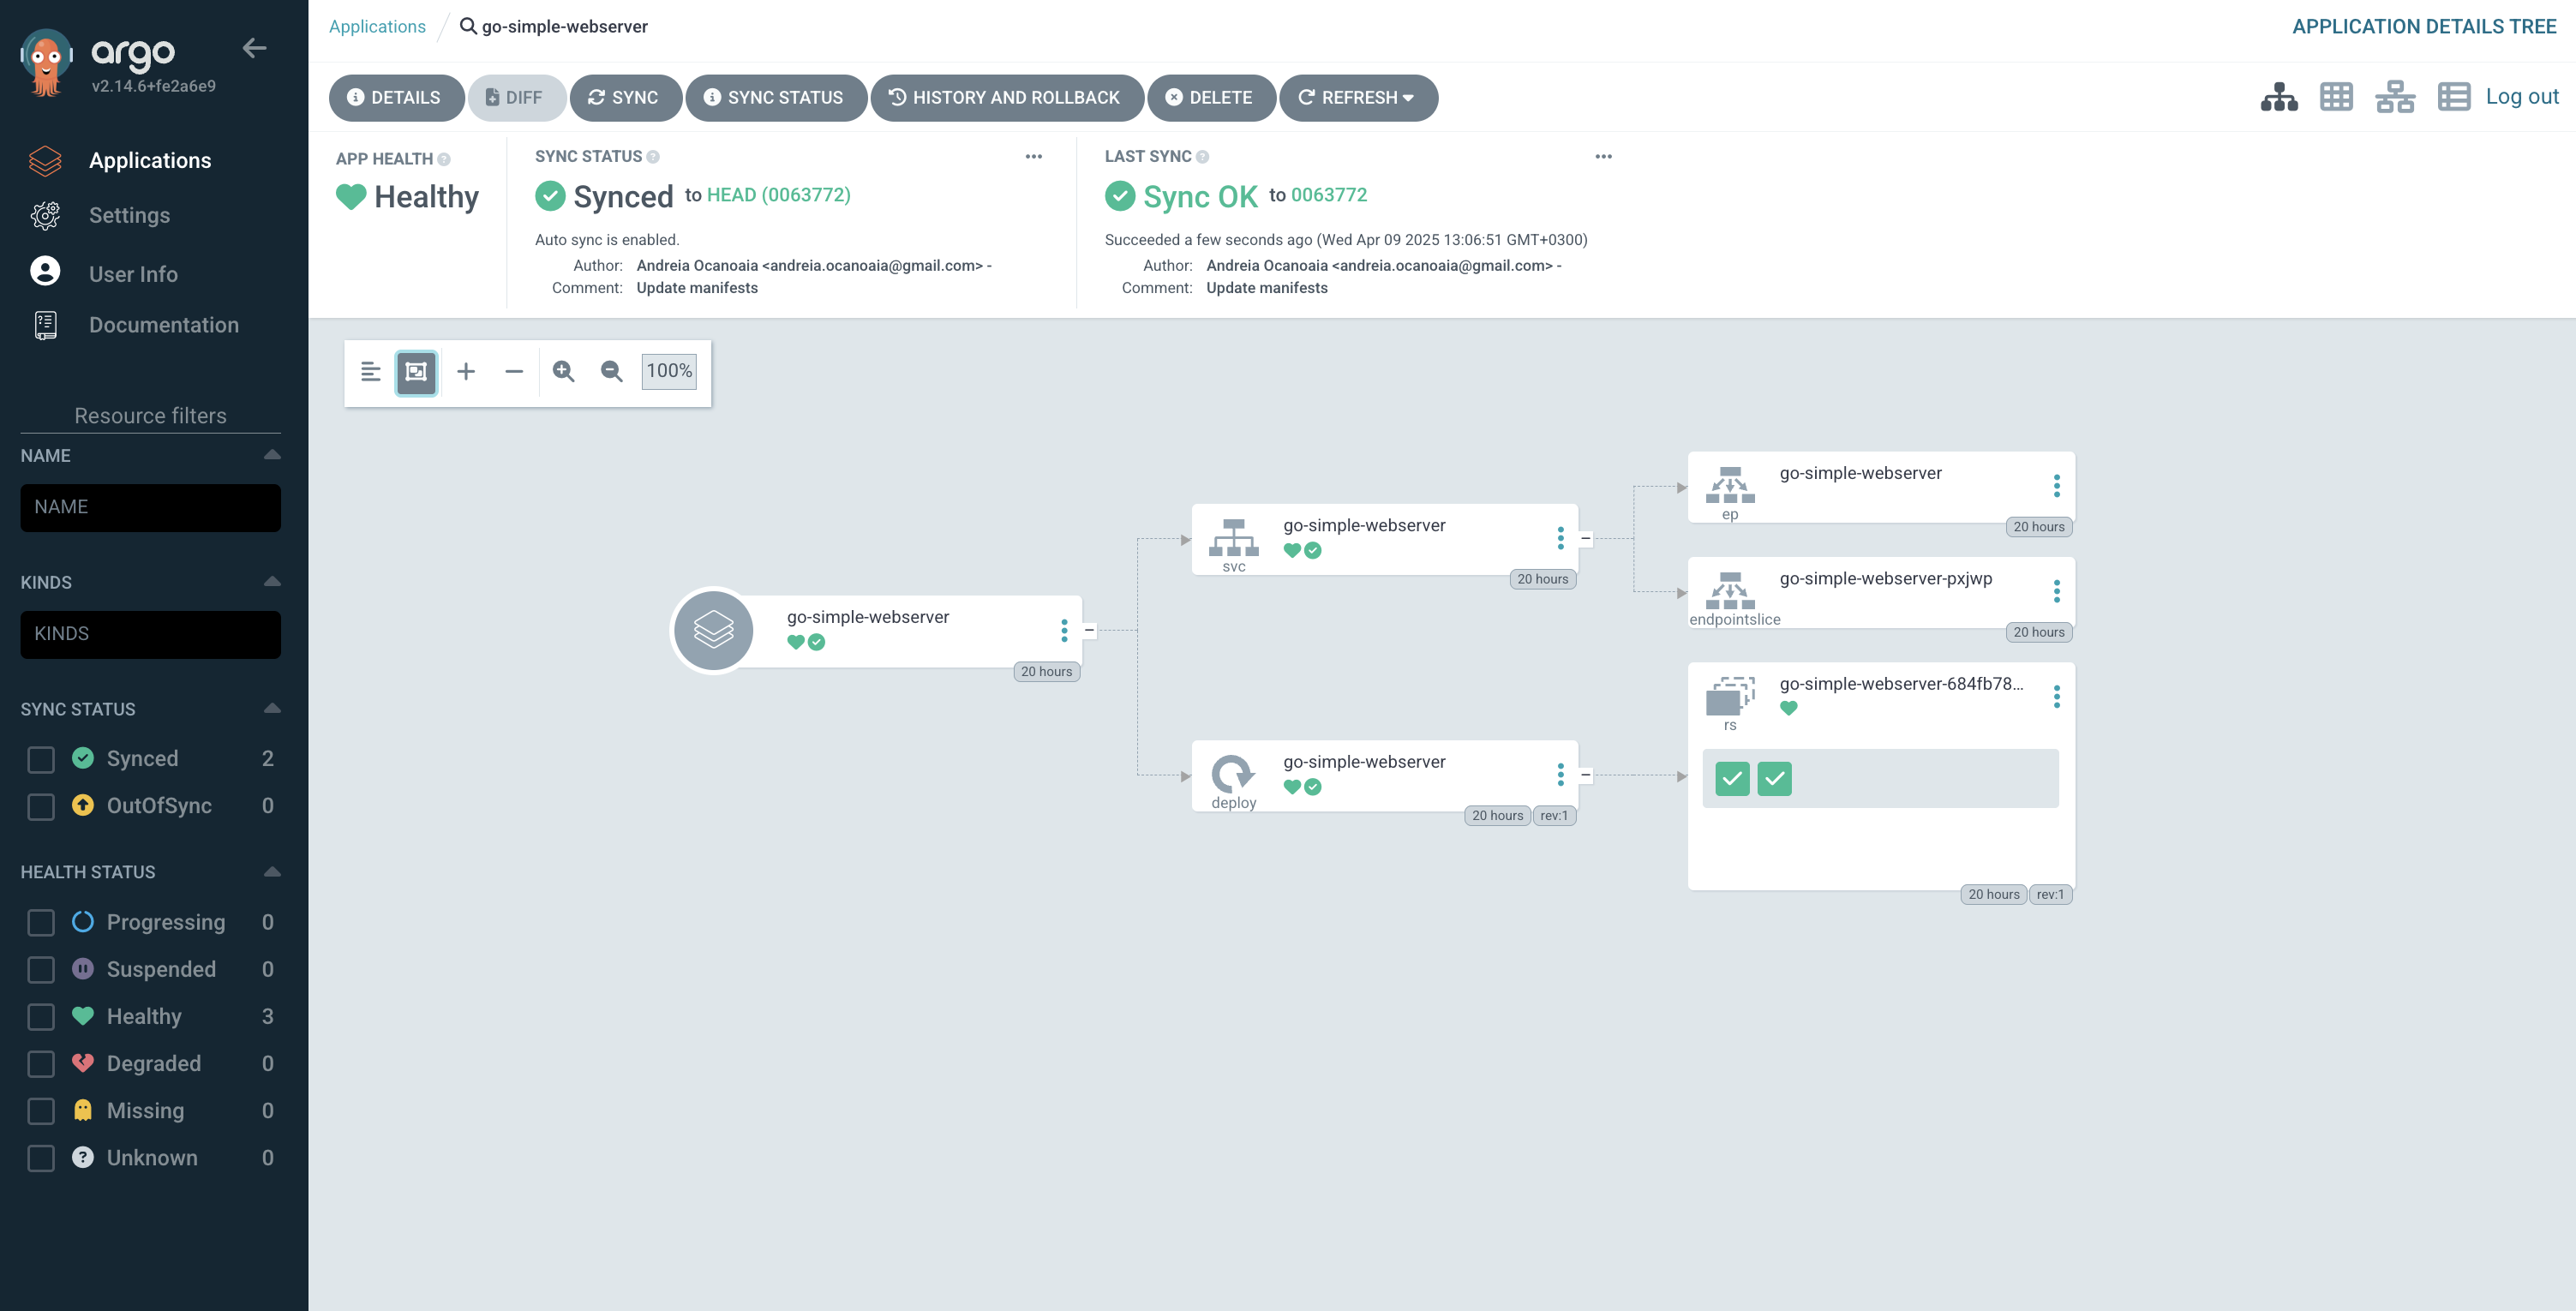
You can also check the Argo CD dashboard to see the new deployment created:
Exercise - Enable Argo CD auto-sync
Modify the application.yaml manifest to enable Argo CD's auto-sync feature, so that after changes are made to the manifests directory, it will automatically trigger a deployment.
Don't forget to re-apply the modified manifest using kubectl.
Check the official Argo CD documentation for the correct syntax.
Exercise - Change the number of replicas and re-sync the project
Update the number of replicas in manifests/deployment.yaml from 2 to 10, push the changes to your repo and monitor the changes to check if the auto-sync feature works as expected.
Argo CD polls the repository every 3 minutes by default to check if there are any changes to manifests.
You can force a hard refresh by clicking the Refresh button in the Argo CD dashboard or by running the following command:
student@cc-lab:~$ argocd app get go-simple-webserver --refresh
Argo Rollouts - Canary deployments
Argo Rollouts is a Kubernetes controller and set of CRDs (Custom Resource Definitions) that provide advanced deployment capabilities for Kubernetes applications. It allows you to perform canary deployments, blue/green deployments, and more.
argo-rollouts is already installed in on your VM by the lab_ci_cd.sh setup script.
Creating resources for Argo Rollouts in K8s
To enable and create the resources required by Argo Rollouts in your Kubernetes cluster, run the following commands:
student@cc-lab:~$ kubectl create namespace argo-rollouts
student@cc-lab:~$ kubectl apply -n argo-rollouts -f https://github.com/argoproj/argo-rollouts/releases/latest/download/install.yaml
student@cc-lab:~$ kubectl get all -n argo-rollouts
NAME                                READY   STATUS    RESTARTS   AGE
pod/argo-rollouts-974ccd9c9-zckrj   1/1     Running   0          25h

NAME                            TYPE        CLUSTER-IP     EXTERNAL-IP   PORT(S)    AGE
service/argo-rollouts-metrics   ClusterIP   10.96.123.75   <none>        8090/TCP   25h

NAME                            READY   UP-TO-DATE   AVAILABLE   AGE
deployment.apps/argo-rollouts   1/1     1            1           25h

NAME                                      DESIRED   CURRENT   READY   AGE
replicaset.apps/argo-rollouts-974ccd9c9   1         1         1       25h
Creating a canary rollout
This manifest defines a Rollout resource to deploy the go-simple-webserver using a canary strategy, gradually shifting traffic from 50% to 100% with a 60-second pause in between. This enables safer deployments by allowing observation and rollback between rollout steps.
student@cc-lab:~/ci_cd_lab$ cat manifests/rollout.yaml
apiVersion: argoproj.io/v1alpha1
kind: Rollout
metadata:
  name: go-simple-webserver
  labels:
    app: go-simple-webserver
spec:
  replicas: 10
  strategy:
    canary:
      steps:
        - setWeight: 50
        - pause: { duration: 60s }
        - setWeight: 100
  selector:
    matchLabels:
      app: go-simple-webserver
  template:
    metadata:
      labels:
        app: go-simple-webserver
    spec:
      containers:
        - name: webserver
          image: ghcr.io/<todo-add-your-github-username>/ci_cd_lab:latest
          ports:
            - containerPort: 8080
          imagePullPolicy: Always
Push the manifests/rollout.yaml in your repository and monitor how Argo will rollout the application.
student@cc-lab:~/ci_cd_lab$ git add manifests/rollout.yaml
student@cc-lab:~/ci_cd_lab$ git commit -m "add rollout.yaml"
student@cc-lab:~/ci_cd_lab$ git push
Watch the rollout process in the terminal:
student@cc-lab:~$ argo-rollouts get rollout go-simple-webserver -n default --watch
To see the canary rollout in action, force a new deployment by changing the image tag in the rollout.yaml file.
You can use an old image from GHCR (e.g. ghcr.io/<your-github-username>/go-simple-webserver@sha256:<hash>) and push the changes to your repository.
To see the sha256 hash, go back to the Packages page in GitHub, go to the ci_cd_lab package, and you should see the hash by clicking the "three dots button" near the Digest label.
You should be able to see the rollout process (the old image is marked as stable and the new one as canary) in Argo.
student@ccc-lab:~/ci_cd_lab$ argo-rollouts get rollout go-simple-webserver
Name:            go-simple-webserver
Namespace:       default
Status:          ॥ Paused
Message:         CanaryPauseStep
Strategy:        Canary
  Step:          1/3
  SetWeight:     50
  ActualWeight:  50
Images:          ghcr.io/andreia-oca/ci_cd_lab:latest (canary)
                 ghcr.io/andreia-oca/ci_cd_lab@sha256:db9b124351be3aebf40faaffb5fa7ad4843c06752e11db7cae07447bb708b976 (stable)
Replicas:
  Desired:       10
  Current:       10
  Updated:       5
  Ready:         10
  Available:     10

NAME                                             KIND        STATUS     AGE    INFO
⟳ go-simple-webserver                            Rollout     ॥ Paused   5m15s
├──# revision:4
│  └──⧉ go-simple-webserver-7774779488           ReplicaSet  ✔ Healthy  3m59s  canary
│     ├──□ go-simple-webserver-7774779488-9p52t  Pod         ✔ Running  2m29s  ready:1/1
│     ├──□ go-simple-webserver-7774779488-bnngh  Pod         ✔ Running  2m29s  ready:1/1
│     ├──□ go-simple-webserver-7774779488-lvfv4  Pod         ✔ Running  2m29s  ready:1/1
│     ├──□ go-simple-webserver-7774779488-rfcvn  Pod         ✔ Running  2m29s  ready:1/1
│     └──□ go-simple-webserver-7774779488-vfmg9  Pod         ✔ Running  2m29s  ready:1/1
└──# revision:3
   └──⧉ go-simple-webserver-cb659967             ReplicaSet  ✔ Healthy  5m15s  stable
      ├──□ go-simple-webserver-cb659967-htmh7    Pod         ✔ Running  5m15s  ready:1/1
      ├──□ go-simple-webserver-cb659967-tq6xs    Pod         ✔ Running  5m15s  ready:1/1
      ├──□ go-simple-webserver-cb659967-5kskl    Pod         ✔ Running  4m21s  ready:1/1
      ├──□ go-simple-webserver-cb659967-pzhhq    Pod         ✔ Running  4m21s  ready:1/1
      └──□ go-simple-webserver-cb659967-q4rxb    Pod         ✔ Running  4m21s  ready:1/1
Exercise - change the canary to 3 steps
Modify the rollout strategy to include 3 canary steps: shift traffic to 25%, then 75%, and finally 100%, with a 120-seconds pause between each step.
Don't forget to also change the Docker image tag to force a new rollout.
For example, you can change it back to latest.
Bonus
Argo CD - Rollbacks
During a rollout, you can revert to a previous version using the argo-rollouts CLI. To undo the latest rollout and revert to the previous stable version, run:
student@cc-lab:~$ argo-rollouts abort go-simple-webserver
If the previous rollout is complete, we need to undo to a previous version:
student@cc-lab:~$ argo-rollouts undo go-simple-webserver
To check the state of the rollout, you can use the argo-rollouts get command:
student@cc-lab:~$ argo-rollouts get rollout go-simple-webserver
You can also view the rollout history and revert to a specific revision:
student@cc-lab:~$ argo-rollouts get rollout go-simple-webserver
Name:            go-simple-webserver
Namespace:       default
Status:          ॥ Paused
Message:         CanaryPauseStep
Strategy:        Canary
  Step:          1/3
  SetWeight:     50
  ActualWeight:  50
Images:          ghcr.io/andreia-oca/ci_cd_lab:latest (canary)
                 ghcr.io/andreia-oca/ci_cd_lab@sha256:db9b124351be3aebf40faaffb5fa7ad4843c06752e11db7cae07447bb708b976 (stable)
Replicas:
  Desired:       10
  Current:       10
  Updated:       5
  Ready:         10
  Available:     10

NAME                                             KIND        STATUS     AGE    INFO
⟳ go-simple-webserver                            Rollout     ॥ Paused   5m15s
├──# revision:4

└──# revision:3
To revert to a specific revision, use the --to-revision flag with the desired revision number:
student@cc-lab:~$ argo-rollouts undo go-simple-webserver --to-revision=X
Exercise - revert to the latest stable version
Push a faulty commit to your repository (e.g. change the docker image to something nonexistent or set container.resources.limits to be less the container.resources.requests).
Check if the rollout is healthy or not:
student@cc-lab:~$ kubectl get rollout go-simple-webserver -n default
student@cc-lab:~$ argo-rollouts get rollout go-simple-webserver -n default
If it's not healthy, rollback to the previous stable version with argo-rollouts undo.
Monitor the deployment's status again:
student@cc-lab:~$ kubectl get rollout go-simple-webserver -n default
student@cc-lab:~$ argo-rollouts get rollout go-simple-webserver -n default