Containers: Docker (Part 2)
We will be using a virtual machine in the faculty's cloud.
When creating a virtual machine in the Launch Instance window:
- Name your VM using the following convention:
cc_lab_<username>, where<username>is your institutional account. - Select Boot from image in Instance Boot Source section
- Select CC 2024-2025 in Image Name section
- Select the m1.xlarge flavor.
In the virtual machine:
-
Download the laboratory archive from here in the
/home/studentdirectory. Use:wget https://repository.grid.pub.ro/cs/cc/laboratoare/lab-containers-part-2.zipto download the archive. -
Extract the archive using
unzip lab-containers-part-2.zip. -
Run
chmod u+x ./lab-containers-part-2.sh && ./lab-containers-part-2.shto create the lab-containers-part-2 directory with the necessary files. -
Navigate to the corresponding directory where you will resolve all the tasks using
cd ./lab-containers-part-2.
$ # Download the laboratory archive
$ wget https://repository.grid.pub.ro/cs/cc/laboratoare/lab-containers-part-2.zip
$ # Extract the archive
$ unzip lab-containers-part-2.zip
$ # Change permissions and execute the setup script
$ chmod u+x ./lab-containers-part-2.sh
$ # Run the setup script
$ ./lab-containers-part-2.sh
$ # Navigate to the working directory
$ cd ./lab-containers-part-2
Recap from the previous laboratory: Containers: Docker (Part 1)
Needs / use-cases
- easy service install
- isolated test environments
- local replicas of production environments
Objectives
- container management (start, stop, build)
- service management
- container configuration and generation
What are containers?
Containers are an environment in which we can run applications isolated from the host system.
In Linux-based operating systems, containers are run like an application which has access to the resources of the host station, but which may interact with processes from outside the isolated environment.
The advantage of using a container for running applications is that it can be easily turned on and off and modified. Thus, we can install applications in a container, configure them and run them without affecting the other system components
A real usecase where we run containers is when we want to set up a server that depends on fixed, old versions of certain libraries. We don't want to run that server on our system physically, as conflicts with other applications may occur. Containerizing the server, we can have a version of the library installed on the physical machine and another version installed on the container without conflict between them.
Containers versus virtual machines?
Both containers and virtual machines allow us to run applications in an isolated environment. However, there are fundamental differences between the two mechanisms. A container runs directly on top of the operating system. Meanwhile, a virtual machine runs its own kernel and then runs the applications on top of that. This added abstraction layer adds overhead to running the desired applications, and the overhead slows down the applications.
Another plus for running containers is the ability to build and pack them iteratively. We can easily download a container from a public repository, modify it, and upload it to a public repository without uploading the entire image. We can do that because changes to a container are made iteratively, saving the differences between the image original and modified version.
There are also cases where we want to run applications inside a virtual machine. E.g, if we want to run a compiled application for an operating system other than Linux, we could not do this because containers can run applications that are compiled for the system host operation. Virtual machines can also run operating systems other than the operating system host.
Volumes
While it makes sense to run Docker containers by themselves as services, all the data that they produce is ephemeral and will be deleted when the container is destroyed.
To provide an input to the containers and a permanent storage for them we use volumes.
Volumes are used to save outputs of files permanently.
Let's start a container based the perpetual-writer image that was prepared for this lab.
The container will be named perpetual-writer and will run in the background.
Use the following command:
docker run -d --name perpetual-writer -v perpetual-storage:/perpetual-storage -t perpetual-writer
Stop it and remove it.
Start a new container based on the same image using the same command.
Enter the container and check the content of the /perpetual-storage/logs file.
The files are still stored on disk but in the /var/lib/docker directory.
To find local mount point of the volume run the docker volume inspect command.
List the content of that directory.
Bind mounts
Bind volumes mount files or directories from the host to a path in the container.
We will be running the nginx container using content from on our host system.
The command to do this from the ~/lab-containers-part-2 directory is:
docker run --name better-nginx -v $PWD/nginx-website:/usr/share/nginx/html:ro -d nginx
The nginx-website directory is mounted to the /usr/share/nginx/html directory.
Verify the content served by the nginx container using curl on port 80 (you will have to find out which is the IP address of the container by using docker inspect).
Now create a local directory named better-website, with an index.html file inside, that has a different content.
Change the above command to mount the better-website directory instead.
See what has changed (use curl again).
Add an additional mount point to the above command to mount the nginx-confs/nginx.conf file as the Nginx configuration file found at /etc/nginx/nginx.conf.
Networking in Docker
One of the advantages of using Docker is the network isolation provided by the solution.
When starting containers, they are isolated by default from the host system's network.
Containers are started in the bridge network.
Let's start a container in the default network and see if we can access it.
docker run --name webserver-1 -d -t python-container:latest
The container was build with the following Dockerfile:
$ cat ~/lab-containers-part-2/python-container/Dockerfile
FROM ubuntu:22.04

# Required to prevent warnings
ARG DEBIAN_FRONTEND=noninteractive
ARG DEBCONF_NONINTERACTIVE_SEEN=true

RUN apt update && apt -y install python3 curl iproute2

RUN rm -rf /var/lib/apt/lists/* /tmp/* /var/tmp/*

RUN mkdir /var/www

COPY ./index.html /var/www

WORKDIR /var/www
CMD ["/usr/bin/python3", "-m", "http.server",  "8888"]
Try to connect to the container using curl:
$ curl localhost:8888
curl: (7) Failed to connect to localhost port 8888 after 0 ms: Connection refused
We notice that the webserver-1 container is configured to listen on port 8888, but we cannot connect to it.
On an unmodified docker daemon, containers are started attached to the bridge network` as seen in the following output:
$ docker inspect webserver-1
<snipped out>
            "Networks": {
                "bridge": {
                    "IPAMConfig": null,
                    "Links": null,
                    "Aliases": null,
                    "MacAddress": "c6:3e:d8:a0:3e:9a",
                    "DriverOpts": null,
                    "GwPriority": 0,
                    "NetworkID": "188b195a78b1369bdfe401ab66d1b753d55d5d971e0629a46f01b29b1d3c56c2",
                    "EndpointID": "ac90c0cd5b9cd50354434644f7562edbc6f0aaba5dc9dbc21be7c0251663e1f2",
                    "Gateway": "172.17.0.1",
                    "IPAddress": "172.17.0.2",
                    "IPPrefixLen": 16,
                    "IPv6Gateway": "",
                    "GlobalIPv6Address": "",
                    "GlobalIPv6PrefixLen": 0,
                    "DNSNames": null
                }
            }
<snipped out>
The container outbound connectivity (including to the Internet) as seen below.
You will have run apt update and apt install iputils-ping inside the container first, to install ping.
$ docker exec webserver-1 ping -c2 8.8.8.8
PING 8.8.8.8 (8.8.8.8) 56(84) bytes of data.
64 bytes from 8.8.8.8: icmp_seq=1 ttl=115 time=27.0 ms
64 bytes from 8.8.8.8: icmp_seq=2 ttl=115 time=25.6 ms

--- 8.8.8.8 ping statistics ---
2 packets transmitted, 2 received, 0% packet loss, time 1001ms
rtt min/avg/max/mdev = 25.598/26.291/26.985/0.693 ms
But we can also see that the container does not run on the same network as the host system:
student@cc:~/lab-containers-part-2/python-container$ ip addr show
1: lo: <LOOPBACK,UP,LOWER_UP> mtu 65536 qdisc noqueue state UNKNOWN group default qlen 1000
    link/loopback 00:00:00:00:00:00 brd 00:00:00:00:00:00
    inet 127.0.0.1/8 scope host lo
       valid_lft forever preferred_lft forever
    inet6 ::1/128 scope host
       valid_lft forever preferred_lft forever
2: wlp1s0: <BROADCAST,MULTICAST,UP,LOWER_UP> mtu 1500 qdisc noqueue state UP group default qlen 1000
    link/ether 00:d4:9e:81:ed:40 brd ff:ff:ff:ff:ff:ff
    inet 10.41.176.16/16 brd 10.41.255.255 scope global dynamic noprefixroute wlp1s0
       valid_lft 684574sec preferred_lft 684574sec
    inet6 fe80::817e:8f5d:8ec:3ee7/64 scope link noprefixroute
       valid_lft forever preferred_lft forever
Here, you will have to install the iproute2 package inside the container before running the command:
student@cc:~/lab-containers-part-2/python-container$ docker exec webserver-1 ip a s
1: lo: <LOOPBACK,UP,LOWER_UP> mtu 65536 qdisc noqueue state UNKNOWN group default qlen 1000
    link/loopback 00:00:00:00:00:00 brd 00:00:00:00:00:00
    inet 127.0.0.1/8 scope host lo
       valid_lft forever preferred_lft forever
    inet6 ::1/128 scope host
       valid_lft forever preferred_lft forever
2: eth0@if160: <BROADCAST,MULTICAST,UP,LOWER_UP> mtu 1500 qdisc noqueue state UP group default
    link/ether c6:3e:d8:a0:3e:9a brd ff:ff:ff:ff:ff:ff link-netnsid 0
    inet 172.17.0.2/16 brd 172.17.255.255 scope global eth0
       valid_lft forever preferred_lft forever
The issue is that a separate virtual network is created for containers.
This network is connected to the host system via a virtual bridge created by the docker daemon.
The name of the default docker bridge is called docker0 and we can see it below:
student@cc:~/lab-containers-part-2/python-container$ ip addr show docker0
6: docker0: <BROADCAST,MULTICAST,UP,LOWER_UP> mtu 1500 qdisc noqueue state UP group default
    link/ether fe:01:47:f0:80:ee brd ff:ff:ff:ff:ff:ff
    inet 172.17.0.1/16 brd 172.17.255.255 scope global docker0
       valid_lft forever preferred_lft forever
    inet6 fe80::fc01:47ff:fef0:80ee/64 scope link
       valid_lft forever preferred_lft forever
An explicit config has to be made to forward a port from the host system to the container.
For that, the -p option is used.
student@cc:~/lab-containers-part-2/python-container$ docker run --name webserver -d -p 8000:8888 -t python-container:latest
9df13f47a64f98b4d816cc43f7989f812e3a7575538f6b7a2c07740540a843a3
student@cc:~/lab-containers-part-2/python-container$ curl localhost:8000
Simple Python server
In the above example we have opened port 8000 on the host machine and forwarded it to port 8888 on the container.
Ports bellow 1024 require root access to be forwarded.
Exercise: Container port forwarding
Create a new webserver-8844 container based on the python-container image and forward port 8844 on the local machine to port 8888 on the container.
Creating new networks
The docker create network command creates a new network as follows:
student@cc:~/lab-containers-part-2/python-container$ docker network create isolated-servers
c8c6de8430e81a2e86d2c7e7705d826c0ce5e19cb06facbb7d6e730166103f5d
student@cc:~/lab-containers-part-2/python-container$ docker network list
NETWORK ID     NAME                    DRIVER    SCOPE
188b195a78b1   bridge                  bridge    local
419795d5abb0   cloud-courses_default   bridge    local
7bb2bee32f12   docker_default          bridge    local
e541c06d4f1c   host                    host      local
c8c6de8430e8   isolated-servers        bridge    local
7649b3737768   none                    null      local
We have used the docker network list command to list all the docker networks on the system.
The host and none networks are described in a future section
To start a container inside of a network you have to add the --network option to the docker run command.
docker run --network isolated-servers --name webserver-2 -d -p 8000:8888 -t python-container:latest
student@cc:~/lab-containers-part-2/python-container$ docker exec webserver-2 ip addr show
1: lo: <LOOPBACK,UP,LOWER_UP> mtu 65536 qdisc noqueue state UNKNOWN group default qlen 1000
    link/loopback 00:00:00:00:00:00 brd 00:00:00:00:00:00
    inet 127.0.0.1/8 scope host lo
       valid_lft forever preferred_lft forever
    inet6 ::1/128 scope host
       valid_lft forever preferred_lft forever
2: eth0@if166: <BROADCAST,MULTICAST,UP,LOWER_UP> mtu 1500 qdisc noqueue state UP group default
    link/ether fa:83:22:2c:df:08 brd ff:ff:ff:ff:ff:ff link-netnsid 0
    inet 172.19.0.2/16 brd 172.19.255.255 scope global eth0
       valid_lft forever preferred_lft forever
We notice that while we were running in the 172.17.0.0/16 network before, the webserver-2 container is in the 172.19.0.0/16 network.
Exercise: Starting containers in networks
Start a new container in the isolated-server network named client based on the python-container:latest image.
Check the connection between the client and webserver-2 containers using the curl command.
What port should you query on to get the web server message? Why?
Running a real world container on a separate network
We will use as an example, a set of containers consisting of a MySQL database and a WordPress service.
To start the two containers we will use the following commands:
student@lab-docker:~$ docker network create test-net
69643d63f7a785c07d4b93cf77a8b921e97595da778344e9aa8f62ac9cb6909a
student@lab-docker:~$ docker run -d --hostname db --network test-net -e "MYSQL_ROOT_PASSWORD=somewordpress" -e "MYSQL_DATABASE=wordpress" -e "MYSQL_USER=wordpress" -e "MYSQL_PASSWORD=wordpress" mysql:5.7
657e3c4a23e120adf0eb64502deead82e156e070f7e9b47eff522d430279d3e1
student@lab-docker:~$ docker run -d --hostname wordpress --network test-net -p "8000:80" -e "WORDPRESS_DB_HOST=db" -e "WORDPRESS_DB_USER=wordpress" -e "WORDPRESS_DB_PASSWORD=wordpress" gitlab.cs.pub.ro:5050/scgc/cloud-courses/wordpress:latest
Unable to find image 'wordpress:latest' locally
latest: Pulling from library/wordpress
c229119241af: Pull complete
47e86af584f1: Pull complete
e1bd55b3ae5f: Pull complete
1f3a70af964a: Pull complete
0f5086159710: Pull complete
7d9c764dc190: Pull complete
ec2bb7a6eead: Pull complete
9d9132470f34: Pull complete
fb23ab197126: Pull complete
cbdd566be443: Pull complete
be224cc1ae0f: Pull complete
629912c3cae4: Pull complete
f1bae9b2bf5b: Pull complete
19542807523e: Pull complete
59191c568fb8: Pull complete
30be9b012597: Pull complete
bb41528d36dd: Pull complete
bfd3efbb7409: Pull complete
7f19a53dfc12: Pull complete
23dc552fade0: Pull complete
5133d8c158a7: Pull complete
Digest: sha256:df2edd42c943f0925d4634718d1ed1171ea63e043a39201c0b6cbff9d470d571
Status: Downloaded newer image for wordpress:latest
b019fd009ad4bf69a9bb9db3964a4d446e9681b64729ffb850af3421c1df070c
The useful options above are:
-esets an environment variable. This variable will be received by the container;-pexposes an internal port of the container (80) to a port on the host machine (8000);--hostnamemakes it so the container uses a specific hostname;--networkconnects the container to a network other than the default.
We noticed in the output that we created the test-net network. We did this because in the default docker configuration, containers cannot communicate between themselves.
We can connect using the Firefox browser to the virtual machine on port 8000 to configure the WordPress server.
Exercise: Running commands in the container
Start a container that hosts the NextCloud file sharing service. To connect to the NextCloud service, you need to expose the HTTP server running in the virtual machine. To do this, follow the example above. The container image name is nextcloud.
Docker Compose
Automate container startup using Docker Compose
As we can see from the above example, we can start containers using the docker run command, but that means running a command for each container.
This is simple when we only need to start two containers, but if we want to start more than two containers, or if we want to offer users a "one click" solution and we have a suite of containers needed for our solution, running in an ordered manner for each container does not scale.
The solution to this issue is the Docker Compose mechanism. It allows an administrator to write a specification for a work environment, including options for running containers, creating volumes, and networks where containers will communicate.
The command is called docker-compose, and it uses docker-compose.yaml files which look like this:
version: "3.3"

services:
  db:
    image: mysql:5.7
    networks:
      - wordpress-net
    environment:
      MYSQL_ROOT_PASSWORD: somewordpress
      MYSQL_DATABASE: wordpress
      MYSQL_USER: wordpress
      MYSQL_PASSWORD: wordpress

  wordpress:
    depends_on:
      - db
    image: wordpress:latest
    networks:
      - wordpress-net
    ports:
      - "8000:80"
    environment:
      WORDPRESS_DB_HOST: db
      WORDPRESS_DB_USER: wordpress
      WORDPRESS_DB_PASSWORD: wordpress
      WORDPRESS_DB_NAME: wordpress

networks:
    wordpress-net:
Create a docker-compose.yaml file with the above content.
Make sure all containers from the previous exercises are stopped and removed.
In order to start the containers we use the docker-compose up -d command:
student@lab-docker:~$ docker-compose up -d
WARNING: Some networks were defined but are not used by any service: wordpress-net
Creating network "student_default" with the default driver
Creating student_db_1 ... done
Creating student_wordpress_1 ... done
Attaching to student_db_1, student_wordpress_1
db_1         | 2022-04-05 03:48:41+00:00 [Note] [Entrypoint]: Entrypoint script for MySQL Server 5.7.37-1debian10 started.
db_1         | 2022-04-05 03:48:41+00:00 [Note] [Entrypoint]: Switching to dedicated user 'mysql'
db_1         | 2022-04-05 03:48:42+00:00 [Note] [Entrypoint]: Entrypoint script for MySQL Server 5.7.37-1debian10 started.
db_1         | 2022-04-05 03:48:42+00:00 [Note] [Entrypoint]: Initializing database files
db_1         | 2022-04-05T03:48:42.223165Z 0 [Warning] TIMESTAMP with implicit DEFAULT value is deprecated. Please use --explicit_defaults_for_timestamp server option (see documentation for more details).
db_1         | 2022-04-05T03:48:42.819383Z 0 [Warning] InnoDB: New log files created, LSN=45790
db_1         | 2022-04-05T03:48:42.931685Z 0 [Warning] InnoDB: Creating foreign key constraint system tables.
db_1         | 2022-04-05T03:48:43.011806Z 0 [Warning] No existing UUID has been found, so we assume that this is the first time that this server has been started. Generating a new UUID: 49a0ec32-b493-11ec-b38d-0242ac150002.
db_1         | 2022-04-05T03:48:43.019048Z 0 [Warning] Gtid table is not ready to be used. Table 'mysql.gtid_executed' cannot be opened.
wordpress_1  | WordPress not found in /var/www/html - copying now...
wordpress_1  | Complete! WordPress has been successfully copied to /var/www/html
wordpress_1  | No 'wp-config.php' found in /var/www/html, but 'WORDPRESS_...' variables supplied; copying 'wp-config-docker.php' (WORDPRESS_DB_HOST WORDPRESS_DB_NAME WORDPRESS_DB_PASSWORD WORDPRESS_DB_USER)
wordpress_1  | AH00558: apache2: Could not reliably determine the server's fully qualified domain name, using 172.21.0.3. Set the 'ServerName' directive globally to suppress this message
wordpress_1  | AH00558: apache2: Could not reliably determine the server's fully qualified domain name, using 172.21.0.3. Set the 'ServerName' directive globally to suppress this message
wordpress_1  | [Tue Apr 05 03:48:43.798334 2022] [mpm_prefork:notice] [pid 1] AH00163: Apache/2.4.53 (Debian) PHP/7.4.28 configured -- resuming normal operations
wordpress_1  | [Tue Apr 05 03:48:43.798714 2022] [core:notice] [pid 1] AH00094: Command line: 'apache2 -D FOREGROUND'
db_1         | 2022-04-05T03:48:44.339284Z 0 [Warning] A deprecated TLS version TLSv1 is enabled. Please use TLSv1.2 or higher.
db_1         | 2022-04-05T03:48:44.339352Z 0 [Warning] A deprecated TLS version TLSv1.1 is enabled. Please use TLSv1.2 or higher.
db_1         | 2022-04-05T03:48:44.339950Z 0 [Warning] CA certificate ca.pem is self signed.
db_1         | 2022-04-05T03:48:44.547479Z 1 [Warning] root@localhost is created with an empty password ! Please consider switching off the --initialize-insecure option.
Notice that both containers run in background, due to the -d option. If we wanted to start the containers in foregroud (for example, for debugging), we need to omit -d.
To stop the containers specified in the docker-compose.yaml file we use the docker-compose down command as follows:
student@lab-docker:~$ docker-compose down
WARNING: Some networks were defined but are not used by any service: wordpress-net
Removing student_wordpress_1 ... done
Removing student_db_1        ... done
Removing network student_default
Exercise: NextCloud Deployment using Docker Compose
Write a docker-compose.yaml file that will automatically start the nextcloud container when running the docker-compose up command.
Using persistent storage in containers
Recap: Docker Volumes
When we work with applications that we install on a cluster, they store data ephemerally. Thus, when deleting the container, all the information in the container is deleted. We don't want this to happen in the example of a database, where we rely on information being stored for a long time.
To start a container to which we attach a storage volume, we start the container as follows:
student@lab-docker:~$ docker run -d -v mysql-volume:/var/lib/mysql -e "MYSQL_ROOT_PASSWORD=somewordpress" -e "MYSQL_DATABASE=wordpress" -e "MYSQL_USER=wordpress" -e "MYSQL_PASSWORD=wordpress" mysql:5.7
07ae337cead33307e6146f4e7142345e59d59dd29334b6e37f47268b58d093ac
student@lab-docker:~$ docker exec -it 07ae337cead33307e6146f4e7142345e59d59dd29334b6e37f47268b58d093ac /bin/bash
root@07ae337cead3:/# echo "Hello" > /var/lib/mysql/test-file
root@07ae337cead3:/# exit
student@lab-docker:~$ docker stop 07ae337cead33307e6146f4e7142345e59d59dd29334b6e37f47268b58d093ac
07ae337cead33307e6146f4e7142345e59d59dd29334b6e37f47268b58d093ac
student@lab-docker:~$ docker rm 07ae337cead33307e6146f4e7142345e59d59dd29334b6e37f47268b58d093ac
07ae337cead33307e6146f4e7142345e59d59dd29334b6e37f47268b58d093ac
student@lab-docker:~$ docker run -d -v mysql-volume:/var/lib/mysql -e "MYSQL_ROOT_PASSWORD=somewordpress" -e "MYSQL_DATABASE=wordpress" -e "MYSQL_USER=wordpress" -e "MYSQL_PASSWORD=wordpress" mysql:5.7
ad1b42b46654a8d4c721e69e824aa7ee18f1e39a85e0b27f1ac966c355a2786a
student@lab-docker:~$ docker exec -it ad1b42b46654a8d4c721e69e824aa7ee18f1e39a85e0b27f1ac966c355a2786a /bin/bash
root@ad1b42b46654:/# cat /var/lib/mysql/test-file
Hello
While docker stop stops the container from running, the container's data is pruned after running the docker rm command.
The -v option attaches the mysql-volume to the mysql container to the /var/lib/mysql path.
We notice that after we connected the volume, we wrote "Hello" in a file and it could be read after we restarted the container.
Volumes are by default stored in the /var/lib/docker/volumes/ directory on the host filesystem.
If we want to mount a directory or file on the host system as persistent storage in a container, we can do so using the path to the directory we want to use, instead of the volume name we want to use. The following example illustrates this option:
student@lab-docker:~$ docker run -d -v ~/mysql-vol/:/shared-dir -e "MYSQL_ROOT_PASSWORD=somewordpress" -e "MYSQL_DATABASE=wordpress" -e "MYSQL_USER=wordpress" -e "MYSQL_PASSWORD=wordpress" mysql:5.7
628de4f3c693b25396de4bbaa951636535ecb1c167b1cca785028479676b7cec
student@lab-docker:~$ docker exec -it 628de4f3c693b25396de4bbaa951636535ecb1c167b1cca785028479676b7cec /bin/bash
root@628de4f3c693:/# cat /shared-dir/test-file
Hello
In the case of containers that are run using docker-compose, an entry for configuring volumes will look like this:
version: "3.3"

services:
  db:
    image: mysql:5.7
    networks:
      - wordpress-net
    volumes:
      - mysql-vol
    environment:
      MYSQL_ROOT_PASSWORD: somewordpress
      MYSQL_DATABASE: wordpress
      MYSQL_USER: wordpress
      MYSQL_PASSWORD: wordpress

  wordpress:
    depends_on:
      - db
    image: wordpress:latest
    networks:
      - wordpress-net
    ports:
      - "8000:80"
    environment:
      WORDPRESS_DB_HOST: db
      WORDPRESS_DB_USER: wordpress
      WORDPRESS_DB_PASSWORD: wordpress
      WORDPRESS_DB_NAME: wordpress

volumes:
    mysql-vol:

networks:
    wordpress-net:
Stop the previous docker compose deployment and start a new one, using the recipe that contains volumes. Check that the volumes were created.
After that, tear down the setup and bring it up again, verifying that the volumes have been kept.
Exercise: Mount a persistent volume in the NextCloud container
Start a container from the nextcloud image to which you attach a volume called nextcloud-vol to /var/www/html.
Restart the container and check that the configurations made when starting the container have been saved.
Complex scenarios: Monitor a Minecraft server using Grafana and Prometheus
In the next sections, we will present a case study for running a Minecraft server and monitoring it using containers.
Start a Minecraft server
To download a container image for a Minecraft server, we need to identify an already containerized service on DockerHub.
We will do this using the search function provided by the platform.
When choosing a container to use, we must consider the following factors:
- the number of people who have already downloaded the container; we want to use a service that has been used and verified by as many users as possible;
- the date of the last update; in general, the more recent the updates, the better the support for the service;
- the state of the documentation; the more complete and concise the configuration instructions are, the more we can count on not spending much time preparing the container's runtime environment.
According to the installation instructions on the container's page, we can start the service using the following command:
student@work:~$ docker run -d -p 25565:25565 -e EULA=true --name mc itzg/minecraft-server
    Unable to find image 'itzg/minecraft-server:latest' locally
    latest: Pulling from itzg/minecraft-server
    675920708c8b: Pull complete
    74b551139104: Pull complete
    c290a58bcfd7: Pull complete
    4d6bcabdde06: Pull complete
    02ff7afd9866: Pull complete
    58640237d5df: Pull complete
    d9165be859a2: Pull complete
    575fb4190f2f: Pull complete
    c3c6d5d36ce5: Pull complete
    9f1d7790dab7: Pull complete
    a7a32c154b26: Pull complete
    e253f974e9a6: Pull complete
    d61d99ed5e98: Pull complete
    c78f023f58b3: Pull complete
    70401c8e828a: Pull complete
    4f4fb700ef54: Pull complete
    087988aa5331: Pull complete
    13ee4174c665: Pull complete
    9381121a4fe0: Pull complete
    6a8a23430798: Pull complete
    b5b33c72ea51: Pull complete
    edf873f8c85d: Pull complete
    Digest: sha256:0697315bd265c751821d5796662436efd94edea8e77b42a7404dab22586af73f
    Status: Downloaded newer image for itzg/minecraft-server:latest
    53a920004fa8316ef87e4776f57f6b826825edf8237d08b9791c1936f40e50e2
    student@uso:~/.../labs/09-task-admin/lab-container$ docker image ls
    REPOSITORY              TAG       IMAGE ID       CREATED      SIZE
    itzg/minecraft-server   latest    616bdcb51f15   7 days ago   670MB
    student@uso:~/.../labs/09-task-admin/lab-container$ docker ps
    CONTAINER ID   IMAGE                   COMMAND    CREATED         STATUS                            PORTS                                                      NAMES
    53a920004fa8   itzg/minecraft-server   "/start"   5 seconds ago   Up 4 seconds (health: starting)   0.0.0.0:25565->25565/tcp, :::25565->25565/tcp, 25575/tcp   mc
We used the --name option of the docker run utility to specify an easy-to-remember name for the started container, in this case the name is mc. We added the -p option to open port 25565 on the machine on which the container is running, the port on which communication with the Minecraft server is made.
We notice that the container has been downloaded and started running.
To verify that we have downloaded the container image, we run the docker image ls command, which lists all the containers on the system.
We find in the list of containers the image with the name itzg/minecraft-server.
To verify the operation of the container we will connect to the Minecraft server using the port exposed above.
student@work:~$ curl localhost:25565
        {"translate":"disconnect.genericReason","with":["Internal Exception: io.netty.handler.codec.DecoderException: java.lang.IndexOutOfBoundsException: Index 69 out of bounds for length 1"]}
We notice that we got a Java error back, this means that the Minecraft server, which is based on the Java programming language, is reachable. The error occurs because we were trying to access the container using an HTTP client, instead of using Java.
Deploy Grafana and Prometheus using Docker Compose
As we can see from the example above, we can start containers using the docker run command, but that means running a separate command for each container.
This is simple when we only need to start two containers, but if we want to start more than two containers, or if we want to use a "one click" solution and use a suite of containers needed for our solution, we need a new way to start containers.
The solution to this problem is the Docker Compose service.
It allows a user to write a specification for a working environment, including options for running containers, the volumes attached to the containers, and the networks over which the containers will communicate.
The command used to manage containers is docker-compose, and the container specification is written in the docker-compose.yml file.
The format of the docker-compose.yml file is of the form:
     services:
            service_name:
                image: <image_name>
                volumes:
                    <volume_list>
                ports:
                    <open_ports_list>
                environment:
                    <environment_variables_list>
        volumes:
            <volume_name>:
        networks:
            <network_name>:
The Grafana visualization service is an industry standard for displaying graphs of various shapes and alerting based on user-specified conditions.
Grafana uses a database and an information aggregator. A commonly used aggregator in Grafana is Prometheus, which can connect to external clients and download information from applications that expose information called exporters.
Both services use complex configuration files and variables to specify how they run. Because of this, it is not easy to run their startup commands directly from the command line.
We want to monitor the Minecraft server, to see how resource usage changes.
We will use the node-exporter exporter to collect information about the system on which the server is running.
We will write the following YAML recipe in the docker-compose.yml file:
version: '2.1'

      volumes:
          prometheus_data:
          grafana_data:

      services:

        prometheus:
          image: prom/prometheus:v2.37.9
          container_name: prometheus
          volumes:
            - ./prometheus:/etc/prometheus
            - prometheus_data:/prometheus
          command:
            - '--config.file=/etc/prometheus/prometheus.yml'
            - '--storage.tsdb.path=/prometheus'
            - '--web.console.libraries=/etc/prometheus/console_libraries'
            - '--web.console.templates=/etc/prometheus/consoles'
            - '--storage.tsdb.retention.time=200h'
            - '--web.enable-lifecycle'
          restart: unless-stopped
          ports:
            - 9090:9090

        nodeexporter:
          image: prom/node-exporter:v1.6.1
          container_name: nodeexporter
          volumes:
            - /proc:/host/proc:ro
            - /sys:/host/sys:ro
            - /:/rootfs:ro
          command:
            - '--path.procfs=/host/proc'
            - '--path.rootfs=/rootfs'
            - '--path.sysfs=/host/sys'
            - '--collector.filesystem.ignored-mount-points=^/(sys|proc|dev|host|etc)($$|/)'
          restart: unless-stopped
          ports:
            - 9100:9100

        grafana:
          image: grafana/grafana:9.1.7
          container_name: grafana
          volumes:
            - grafana_data:/var/lib/grafana
            - ./grafana/provisioning:/etc/grafana/provisioning
          environment:
            - GF_SECURITY_ADMIN_USER=admin
            - GF_SECURITY_ADMIN_PASSWORD=usorules
            - GF_USERS_ALLOW_SIGN_UP=false
          restart: unless-stopped
          ports:
            - 3000:3000
This file was generated based on an existing open source repository, adapted for our use case.
Entries under the volumes tag represent shared directories between the container and the physical system.
Container volumes provide persistence to the information recorded in the container.
By default, containers store information ephemerally, if a container has been deleted, the information within it has also been deleted.
A mounted directory is of the form <source directory>:<destination directory>.
If the source directory is not a path in the system, a volume is generated within the working directory of the Docker service.
The Grafana, Prometheus and node_exporter services are accessible over the network from a browser and communicate via ports.
In order to access these services, we need to expose the ports.
Port exposure is done under the ports tag, with each port defined as <source port>:<destination port>.
Containerized services are configured using the environment tag.
The Grafana system password was configured using the GF_USERS_ADMIN_USER and GF_SECURITY_ADMIN_PASSWORD environment variables.
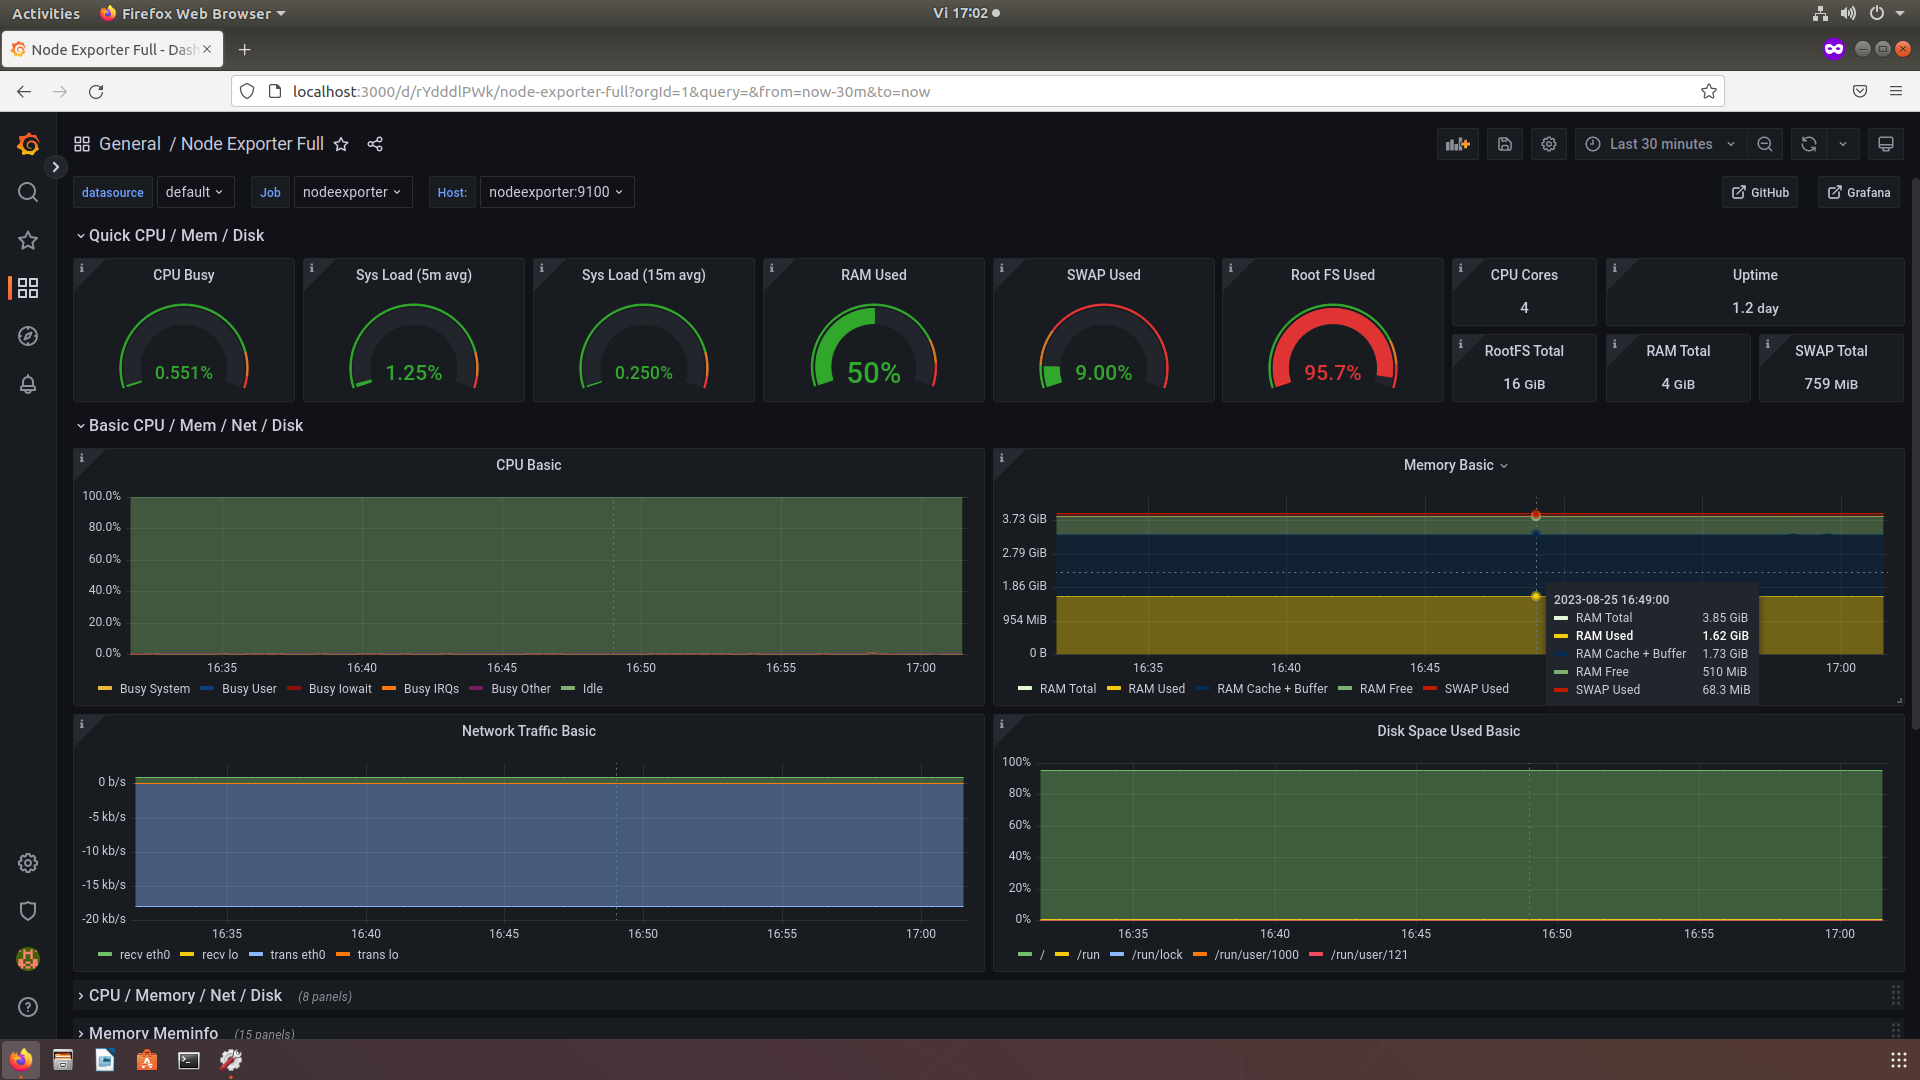
Connect to the GUI
We will authenticate to the virtual machine at the monitoring service in the browser at the
address localhost:3000.
We have set the administrator user admin and the password usorules.
We will be asked to modify this information.
Once authenticated, click on the dashboards button, then on browse and access the Node Exporter Full panel by clicking on its name.
In the current version of the lab infrastructure, the Node Exporter Full dashboard is not automatically imported and you will not see it.
However, you can search online for a similar dashboard and try to import it in Grafana yourself.

Displaying information in Grafana is done using dashboards. These can be generated dynamically by users, or they can be downloaded as JSON files.
When using docker-compose based services, it is not enough to have a docker-compose.yaml file.
Services are also configurable through configuration files that we must define.
Within the working directory (grafana/), we generated the configuration files for the Prometheus and Grafana services.
These files configure Prometheus to connect to node_exporter and configure Grafana to display the information stored in Prometheus.
These files are not relevant for a simple setup, the advantage of using containerized services is precisely the fact that we do not have to write all the configuration files ourselves and we have an already functionally configured service.
We observe below the complete file hierarchy:
       grafana
        ├── docker-compose.yml
        ├── grafana
        │   └── provisioning
        │       ├── dashboards
        │       │   ├── 1860_rev31.json
        │       │   ├── dashboard.yml
        │       │   └── monitor_services.json
        │       └── datasources
        │           └── datasource.yml
        └── prometheus
            └── prometheus.yml
Exercise: Installing a media hosting service (Plex)
An example of using Docker containers in an easy way is to host a private media server. The service provided is like using the Netflix or Disney+ service hosted on your own computer. Media hosting services are used to manage your own media library, organizing, sorting and downloading metadata in a centralized portal. Another advantage of these services is that they can be viewed on any device that has access to the computer running the container through a browser, whether it is a TV, tablet or mobile phone.
The Plex service is one of the best-known media hosting services.
It can manage audio, photo and video content.
The service can be run natively within the system, or it can run in the container.
The advantage of using Plex in a container is the ease of installation and management of the system.
It is enough to just download the container and start it using the docker-compose command.
For this exercise, it is enough to search for a container image for the Plex service on the DockerHub platform.
We notice that we have two possibilities of official containers, the first is packaged and provided by linuxserver.io, and the second is provided by Plex Inc.
We will use the solution provided by linuxserver.io, since they generally provide containers that are optimally packaged for use in containers.
Based on the docker-compose.yaml sample file provided by linuxserver.io on the Docker Hub page, configure it to start a Plex media server that has the library loaded using a volume in the plex directory and exposes port 32400 to the host system.
Verify that you can play the song loaded in the plex directory using Plex.